There’s nothing quite like the glorious aroma of freshly toasted bread filling your kitchen. It’s a scent that can awaken sleepy senses or give comfort on the roughest days. Have you ever wondered about the history of toasting bread? Now, imagine if every slice of toast you made was perfectly golden-brown, never burnt nor underdone? With your oven effectively transforming into your personal toaster, this dream can be your daily bread reality. Dive into our guide on ‘How to Toast Bread in the Oven Perfectly Every Time’, and become a maestro of the warm, crunchy perfection that is superbly toasted bread. It’s time to level up your breakfast game!
Preheat your oven to 350°F. Place your slices of bread on a baking sheet and bake for 4-6 minutes. Flip each slice over and bake for another 4-5 minutes until both sides are golden brown. This simple method produces perfectly toasted bread without the need for a toaster, and allows you to toast large batches at once.
Preparation and Supplies Required

Before you embark on the journey of toasting bread in the oven, it’s important to gather the necessary supplies and make a few preparations. To ensure a perfect outcome every time, here are the key steps to follow.
Firstly, you’ll need a reliable oven toaster tray. Ideally, choose one with a rim that will prevent any drippings from falling into your oven and causing a mess. A rimmed baking sheet works well for this purpose. If you don’t have one already, it’s worth investing in as it can serve various other cooking needs as well.
Next, select the bread you wish to toast. You can use any type of bread that suits your taste preferences – be it white, whole wheat, sourdough, or even artisanal loaves. The choice is yours! Just ensure that the bread is sliced evenly to facilitate even toasting.
Don’t forget to preheat your oven to 350°F (175°C) before placing the bread inside. This step is crucial for achieving that perfect golden brown color and crispness. Allow your oven a few minutes to reach the desired temperature for optimal results.
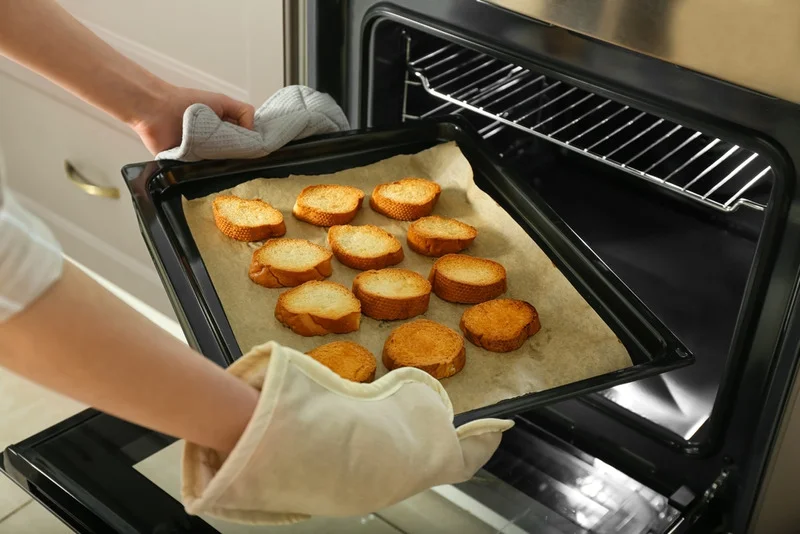
Preparing your bread for toasting involves arranging the slices on the rimmed baking sheet. Ensure there is enough space between each slice so that they can evenly brown without sticking together. You may want to line the tray with parchment paper or foil for easy cleanup afterward.
Now that everything is prepared and ready, it’s time to move on to setting up your oven toaster tray for successful bread toasting.
- According to Statista, in 2020 nearly 204 million Americans consumed toasted bread, and some portion of these individuals likely utilized the oven-toasting method.
- A scientific study found that toasting bread can alter its glycemic index; for example, according to British Journal of Nutrition, toasting white bread can lower its glycemic index by approximately 39%.
- Research from the American Chemical Society shows that baking or toasting bread at high temperatures (such as those found in an oven) can result in the formation of acrylamide, a substance that could potentially have harmful health effects if consumed in excess.
- To ensure perfectly toasted bread, it’s important to gather the necessary supplies such as a reliable oven toaster tray with a rim, select evenly sliced bread, preheat the oven to 350°F (175°C), arrange the slices with enough space between them on a lined baking sheet, and allow a few minutes for the oven to reach temperature before placing the tray inside. Following these steps will lead to delicious and crispy toast every time.
Setting Up an Oven Toaster Tray
Positioning your oven toaster tray correctly is essential for ensuring even heat distribution and perfectly toasted bread. Follow these steps to set it up properly:
Start by placing the oven rack in the second position from the top of the oven. This placement ensures that the bread is exposed directly to the heating element without being too close or too far away. Adjusting the rack allows for better control over the toasting process and helps prevent burning.
Once the oven rack is set, carefully place your prepared bread slices on the rimmed baking sheet. Make sure they are evenly spaced and not touching each other. This arrangement guarantees that hot air can circulate around each slice, promoting even browning on all sides.
Imagine the aroma filling your kitchen as you artfully arrange the bread slices on the tray, anticipating the delightful crunch that awaits after toasting.
Now that you have properly set up your oven toaster tray, it’s time for the final step – toasting the bread! Follow the provided instructions for either the no-broiler or broiler method, depending on your preferred level of toasting. Keep a close eye on the bread as it toasts, checking frequently to prevent burning and achieve that perfect golden brown color.
With these preparations and proper setup, you’re well on your way to enjoying perfectly toasted bread straight from your oven!
Preparing Your Bread for Toasting
Before you start toasting your bread in the oven, it’s important to prepare it properly. This step ensures that your bread will turn out perfectly toasted every time. Here are some key points to consider when preparing your bread for toasting:
First and foremost, choose the right type of bread. Opt for slices that are sturdy and can hold up well during the toasting process. Dense breads like sourdough or whole wheat work particularly well, as they have a good structure and won’t become too crispy or burnt.
Next, ensure that your bread is sliced to the desired thickness. Thicker slices will take longer to toast and may result in uneven browning. On the other hand, very thin slices may become too crispy or even burn easily.
Now, let’s talk about whether you should butter or grease the baking sheet before placing the bread on it. It’s generally recommended not to do so when toasting bread in the oven. Greasing the baking sheet can lead to excessive browning or even burning of the edges. Keeping the baking sheet ungreased allows the heat from the oven to evenly distribute and create a golden brown crust on the bread.
Once you’ve selected your bread and prepared your baking sheet, arrange the slices in a single layer on the sheet. Make sure they are not overlapping or touching each other, as this can prevent them from crisping up evenly.
Let’s say you’re using a rimmed baking sheet. Place your slices on it carefully, leaving a little space between each slice to allow air circulation and even browning.
Now that we have covered the preparation steps for toasting your bread, let’s move on to an equally important aspect – applying toppings and coatings.
Applying Toppings and Coatings
One of the most delightful aspects of toast is the opportunity to add various toppings and coatings to enhance its flavor and texture. Whether you prefer sweet or savory, the possibilities are endless. Here are some suggestions on how to apply toppings and coatings to your toasted bread in the oven:
Let’s start with a classic favorite: garlic butter. To make garlic bread, simply spread a generous amount of softened butter mixed with minced garlic over the surface of the bread slices before toasting. This will result in a deliciously aromatic and savory treat that pairs perfectly with pasta or soups.
For those with a sweet tooth, fruit jams like strawberry freezer jam or Saskatoon jam can transform plain toast into a delightful breakfast or snack option. Spread a thin layer of your favorite jam on the toasted bread and enjoy the burst of fruity flavors.
If you’re feeling adventurous, try experimenting with unique toppings such as pickled eggs or various spreads like avocado or hummus. These creative additions can elevate your toast to a whole new level of taste.
As you can see, applying toppings and coatings allows for endless possibilities when it comes to creating delicious and customized toast. Now that we have covered all the aspects of preparing your bread and applying toppings, let’s move on to the final step – baking your bread in the oven.
Baking Your Bread in the Oven

If you find yourself without a toaster or need to toast a large batch of bread, toasting bread in the oven is a simple and easy method. Not only does it provide deliciously crispy toast, but you can also customize the toppings to your liking. Whether you prefer garlic butter, strawberry freezer jam, Saskatoon jam, or even pickled eggs on your toast, the oven allows for endless possibilities. Plus, baking your bread in the oven can be a convenient alternative if you’re already using it for other cooking purposes.
To begin, preheat your oven to the appropriate temperature based on the method you choose: either the no-broiler method or the broiler method. For the no-broiler method, set your oven to 350°F. If you opt for the broiler method, make sure to place your oven rack in the second position from the top and turn on the broiler.
Next, place your slices of bread on a rimmed baking sheet. It’s important not to butter or grease the baking sheet before toasting. This ensures that the bread will brown evenly without becoming excessively greasy. For the no-broiler method, bake the slices of bread for about 4-6 minutes, then flip them over and continue baking for another 4-5 minutes until both sides are golden brown.
If you’re using the broiler method, things move a bit more quickly. Place the baking sheet with the bread slices under the broiler and let them toast for about 1-1/2 minutes. Then carefully flip the slices over and allow them to broil for another minute or so until both sides are nicely browned.
Remember to keep an eye on your toast while it’s in the oven, as it can quickly go from perfectly toasted to burned if left unattended. The exact timing may vary depending on your oven, the thickness of the bread slices, and your preferred level of toasting. It’s always a good idea to check frequently to prevent burning.
A helpful tip is to set a timer or keep an eye on the clock so you don’t forget about your toast while it’s in the oven. And if you have a particularly thick or dense bread, you may need to adjust the timing accordingly to ensure it’s thoroughly toasted.
Now that we’ve gone through the process of baking your bread in the oven, let’s move on to discussing heat setting and temperature requirements.
Heat Setting and Temperature Requirements
The heat setting and temperature you choose for toasting bread in the oven can make a significant difference in how your toast turns out. With two main methods of toasting – the no-broiler method and the broiler method – understanding their heat settings is crucial.
For the no-broiler method, preheating your oven to 350°F creates a moderate heat environment conducive to slowly and evenly browning your bread. This method is ideal if you prefer toast with a crisp exterior but a slightly softer interior.
On the other hand, if you want your toast to have a more intense charred flavor and quicker cooking time, using the broiler method is recommended. For this method, you’ll need to place your oven rack in the second position from the top and turn on the broiler. The broiler provides high direct heat from above, allowing for rapid browning and creating that desirable crispy texture.
Imagine biting into a slice of perfectly toasted sourdough bread with just the right balance of crunchiness on the outside and softness inside. Adjusting the heat setting and temperature requirements based on your preference can help achieve this delightful toast experience.
Whether you opt for a moderate 350°F bake or embrace the direct heat of the broiler, understanding the heat settings and temperature requirements is essential in perfecting your oven-toasted bread. Now that we have explored these two vital elements, let’s move on to the best method for toasting bread in the oven.
The Best Method for Toasting
When it comes to toasting bread in the oven, there are two main methods you can choose from: the no-broiler method and the broiler method. Both approaches have their merits and can yield deliciously toasted bread when done correctly.
The no-broiler method is ideal if you prefer a gentler approach to toasting your bread. To begin, preheat your oven to 350°F and place the slices of bread on a rimmed baking sheet. This method allows for even toasting, as the heat surrounds the bread from all sides. Bake the bread for 4-6 minutes on one side, then flip the slices over and bake them for another 4-5 minutes until both sides are golden brown. This technique ensures a consistent and evenly toasted result.
On the other hand, if you’re looking for a quicker toasting method that provides a nice crispiness, consider the broiler method. First, position your oven rack in the second position from the top and turn on the broiler setting. Place your bread slices on a baking sheet and put them under the broiler for about 1-1/2 minutes. Keep an eye on them closely to prevent burning. Flip the slices over and broil them for another minute or so until both sides are browned to your liking. This method offers a faster toasting time while still achieving that desirable crunch.
It’s important to note that every oven behaves differently, so it’s essential to keep a watchful eye on your toast as it cooks. Oven temperatures can vary, affecting the cooking time required for perfectly toasted bread. Experimentation may be necessary to find the ideal timing for your specific oven model.
Now that we’ve explored the best methods for toasting in the oven, let’s discuss how you can prevent over-toasting your bread.
Preventing Over-Toasting
Over-toasted bread can quickly turn from a delightful crunch to an unpleasant burnt taste. To ensure your toast comes out perfectly every time, follow these tips to prevent over-toasting:
- Monitor the toast frequently: Keep a close eye on your bread as it toasts in the oven. Oven temperatures can fluctuate, and bread slices may vary in thickness, resulting in faster or slower toasting times. By checking often, you can prevent any potential burning.
- Adjust the oven temperature and rack position: If you find that the bread is browning too quickly or not enough, consider adjusting either the oven temperature or the rack position. Lowering the temperature or moving the rack farther from the heat source can help achieve the desired level of toasting without burning.
- Know your bread: Different types of bread have different moisture levels, which affect their toasting time. Thicker and denser bread may require longer toasting times than thin slices or softer loaves. Understanding your bread’s characteristics will help you gauge how long it needs in the oven.
- Consider using a timer: To avoid getting caught up in other tasks and accidentally over-toasting your bread, use a kitchen timer or set a reminder on your phone. This way, you’ll be alerted when it’s time to check on your toast.
By following these preventive measures, you can achieve perfectly toasted bread that is golden brown and deliciously crunchy without any burnt flavors.
Different Bread and Their Baking Times

When it comes to toasting bread in the oven, it’s important to understand that different types of bread require varying baking times. This knowledge will ensure that you achieve perfectly toasted bread every time. Let’s explore some common bread types and their corresponding baking times.
For thin slices of white sandwich bread or sliced baguettes, a baking time of around 4-6 minutes on each side at 350°F is usually sufficient. These breads tend to toast quickly due to their thinner nature. Keep a close eye on them to prevent burning and flip them halfway through the process for even toasting.
On the other hand, thicker bread varieties like sourdough or artisan loaves may require a longer baking time to achieve a golden brown and crispy exterior, while maintaining a soft interior. To accomplish this, I recommend baking them for approximately 8-12 minutes per side at 350°F. The additional time allows the heat to penetrate deeper into the bread, resulting in a more satisfying texture and flavor.
To help you visualize the variations in baking times for different bread types, here’s a quick reference table:
| Bread Type | Baking Time per Side |
| Thin White Bread | 4-6 minutes |
| Sliced Baguettes | 4-6 minutes |
| Sourdough Loaf | 8-12 minutes |
| Artisan Loaf | 8-12 minutes |
Bear in mind that these figures are general guidelines, as variables such as oven temperature accuracy and personal preference can influence the outcome. Experimentation may be necessary to find your ideal toasting time.
Now that we’ve discussed the different baking times required for various types of bread, let’s explore an alternative method using the broiler for toasting bread.
Using the Broiler for Toasting

If you’re looking for an even quicker and more intense method of toasting bread, utilizing the broiler function in your oven can be a game-changer. The broiler delivers direct, concentrated heat that can swiftly achieve a beautifully toasted result. However, it requires careful attention to prevent burning.
To toast bread using the broiler, start by adjusting the oven rack to the second position from the top. This ensures that the bread is positioned near the heat source for efficient toasting. Preheat the broiler and place your bread slices on a baking sheet lined with parchment paper or aluminum foil for easy cleanup.
Carefully slide the baking sheet with the bread into the oven and allow it to broil for approximately 1-1/2 minutes on one side. Keep a close eye on the process as broiling can quickly turn your toast from golden brown to charred. Once the desired level of toasting is achieved, flip the slices over and continue broiling for another minute or so until both sides are evenly toasted.
While using the broiler can produce quick and satisfying results, it’s important to exercise caution and vigilance throughout the process to avoid any mishaps.